|
 |
Tim Hutcheson wrote:
>
> Thanks for the tips, Rick. I'm going to try to add the red stripe this
> morning and a logo of some sort. Don't know the best way even to add the
> stripe. Is this an sPatch, Moray or Povray problem? I mean I could add a
> cylindrical band as a separate object (as a patch) or section the pin, in
> sPatch, and color that in Moray. But that will add surface anomalies. Or I
> guess I could do it directly in Povray with code, which seems to be the more
> mature way to go at it. But that would mean rolling up my sleeves a bit
> more and learning the language. If so, I'm off to the bookstore to see what
> povray books are there.
There currently are no books in print on Pov-Ray unfortunatly. A better
bet would be a visit to my links page and head towards the online tutorials
section of the page. There you will find a wide variety of tutorials on many
different pov related subjects and they cover from plain white wrapper newbie
all the way to some of the more advanced subjects.
> Obviously there are easy and direct approaches to this but it isn't clear
> how to paint detail on an object as opposed to coloring and texturing an
> object, which is straight forward. When I lathed the bowling pin, I was
> trying to create a toy problem to learn the right approaches to the general
> cases that arise. How would you proceed, other than to just have at it and
> spend hours fiddling?
>
> Thanks for your thoughts in advance.
> --
> Tim Hutcheson
> w4l### [at] bellsouth net
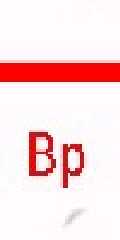
As far as texturing the pins I would not hesitate for a second to
consider using image maps for this. While you could easily add one
red stripe to each pin it gets more difficult to add logos to each
pin with just proceedural texturing alone. I would definatly advise
against breaking up your object unless you just dig doing things the
difficult way. I am attaching a teeny little image to the bottom or
this reply in hopes I don't get burned for posting an image into a
non binaries group. Anyway the image gives you a reasonable idea of
what you could create in a paint program and then use it as a image
map for the colors and even blemishes on the pins.
An example code for applying it would be:
object { Bowling_Pin
pigment {
image_map { gif "PinStripe.gif" interplolate 2 mape_type 0 }
translate -0.5 scale <1, 2, 1> }
}
Or if you have your heart set on a proceedural pigment (no logo with this
method ) try a gradient like this:
object { Bowling_Pin
pigment { gradient y
color_map {
[0.0 rgb <1,1,1>] // white
[0.6 rgb <1,1,1>] // white
[0.6 rgb <1,0,0>] // red
[0.8 rgb <1,0,0>] // red
[0.8 rgb <1,1,1>] // white
[1.0 rgb <1,1,1>] // white
}
scale <1,2,1>}
}
With the above the scale of course will change depending on oyur object size
and you may need to translate it a bit to get the stripe where you need it.
The last example is basicaly jsut that and is not garanteed to work right
out of the box (though I bet it is close).
--
Ken Tyler
mailto://tylereng@pacbell.net net
As far as texturing the pins I would not hesitate for a second to
consider using image maps for this. While you could easily add one
red stripe to each pin it gets more difficult to add logos to each
pin with just proceedural texturing alone. I would definatly advise
against breaking up your object unless you just dig doing things the
difficult way. I am attaching a teeny little image to the bottom or
this reply in hopes I don't get burned for posting an image into a
non binaries group. Anyway the image gives you a reasonable idea of
what you could create in a paint program and then use it as a image
map for the colors and even blemishes on the pins.
An example code for applying it would be:
object { Bowling_Pin
pigment {
image_map { gif "PinStripe.gif" interplolate 2 mape_type 0 }
translate -0.5 scale <1, 2, 1> }
}
Or if you have your heart set on a proceedural pigment (no logo with this
method ) try a gradient like this:
object { Bowling_Pin
pigment { gradient y
color_map {
[0.0 rgb <1,1,1>] // white
[0.6 rgb <1,1,1>] // white
[0.6 rgb <1,0,0>] // red
[0.8 rgb <1,0,0>] // red
[0.8 rgb <1,1,1>] // white
[1.0 rgb <1,1,1>] // white
}
scale <1,2,1>}
}
With the above the scale of course will change depending on oyur object size
and you may need to translate it a bit to get the stripe where you need it.
The last example is basicaly jsut that and is not garanteed to work right
out of the box (though I bet it is close).
--
Ken Tyler
mailto://tylereng@pacbell.net
Post a reply to this message
Attachments:
Download 'bowlpin.jpg' (3 KB)
Preview of image 'bowlpin.jpg'
|
|


